Feb 16, 2022
Overcoming Obstacles to Advanced Air Sealing
We all know the basics of energy efficiency. Air seal high in the building, then low, then insulate. Seems simple, right? Stop the air from leaking into or out of the building. Save money. Increase comfort. Promote healthy indoor air quality (with the appropriate ventilation system, of course). However, when you go to execute these simple principles on a complex house, you find that this black-and-white directive dissolves into seemingly endless shades of gray.
By: Andrew Woodruff
We all know the basics of energy efficiency. Air seal high in the building, then low, then insulate. Seems simple, right? Stop the air from leaking into or out of the building. Save money. Increase comfort. Promote healthy indoor air quality (with the appropriate ventilation system, of course). However, when you go to execute these simple principles on a complex house, you find that this black-and-white directive dissolves into seemingly endless shades of gray. Different planes, penetrations, and construction problems are all working against the simple fix for air sealing the home. So let’s take this to the next level. Let’s break down the types of difficult air-sealing locations you might encounter in the field, learn how to properly diagnose and correct the issues you might encounter at each location, and most importantly, learn how to prove that your solution was effective. More simply stated: Understand it, fix it, then prove it.
Understand It
To begin correcting air-sealing issues, you must understand how building assemblies come together. If you can visualize the what, when, and how of the components as they came together, you can begin to understand the challenge of air-sealing those locations. Frankly, air-sealing issues are an indication that the original tradespeople working on the house didn’t have a good understanding of building science—so they left these issues for us to handle down the line. We are fixers of incomplete houses, especially in difficult areas where the builder may have moved quickly and overlooked important air sealing details such as bonus rooms above garages, kneewalls, built-ins, cantilevers and the like, which are typically found where the building envelope changes orientation from horizontal to vertical or vice versa. These are the areas that leave you shaking your head, saying, “What were they thinking?” or “Well, there’s your problem right there!”
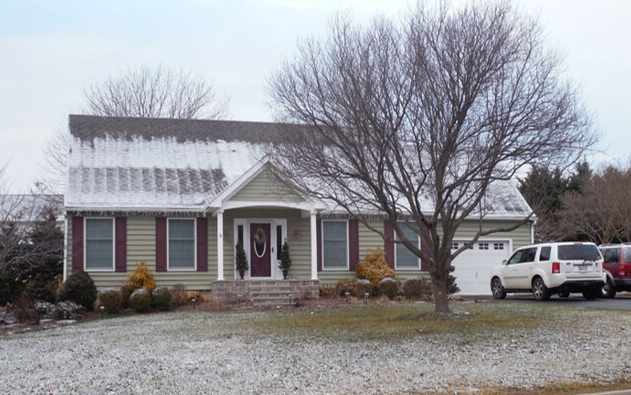
At any rate, a visual assessment will quickly lead you toward any areas of concern. First, look at the style of the house—this will give you tremendous insight into your quest. Cape Cod, split-level, and colonial houses all have the classic dormers, skylights, chimneys, and cantilevers that are a dead giveaway of underlying issues. And don’t be afraid to use a heavy frost or light snow to your advantage. Attic heat loss in these conditions will almost always show its mirror image on the roof.
After determining the likely suspects from the exterior, confirm your assumptions on the interior by looking for chases, dropped soffits, ceiling level changes, additions, and knee wall areas. Last, head into the nether regions of the attic and crawl space to verify assumptions made from the exterior and interior visual inspection.
While the wow factor of your images of the findings from the visual inspection can help you land an easy sale in the private world, federally managed programs like the Weatherization Assistance Program (WAP) may demand diagnostic-driven results. To get them, most programs call for the use of zone pressure diagnostics (ZPD) or infrared thermal imaging in addition to the standard blower door testing. Of the two, thermal imaging is the easiest to perform and is simple to understand, provided you have a decent temperature difference between inside and out, along with a solid conceptual understanding of how buildings are put together. Despite the simple point-and-shoot nature of the cameras, be mindful about what the tool is telling you: Imaging without the blower door usually speaks to insulation alignment issues, while imaging with the blower door usually speaks to air infiltration.
ZPDs, however, are a different beast entirely. Most home energy pros do them regularly, but few understand the limitations of interpreting the results. Zonal readings must be taken in context with the connection of the space you are referencing to the outside. Keep in mind that the pressure reading (measured in pascals) itself is useless without that basis of comparison. For instance, you get an attic with reference to house value of 45. Most folks know that the closer to 50 this value is, the better the air barrier between the two spaces. So we’re all good then, right? Wrong. What a lot of folks don’t know is that 45 only indicates that the ratio of the relative hole size between the attic and the house in which the hole size between the attic and house is one-forth the hole size between the attic and the outdoors (see table below). Knowing that, what would happen if I were to set my air-sealing targets based on zonals alone?
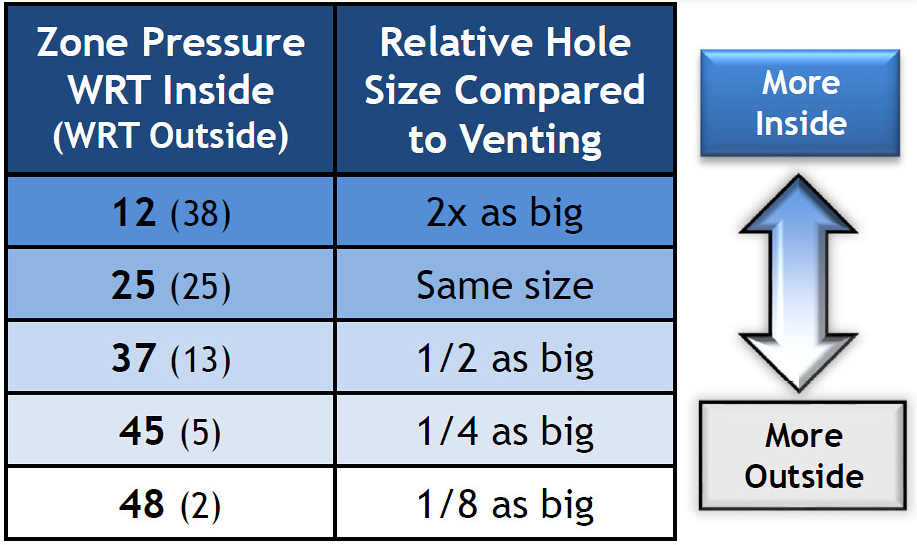
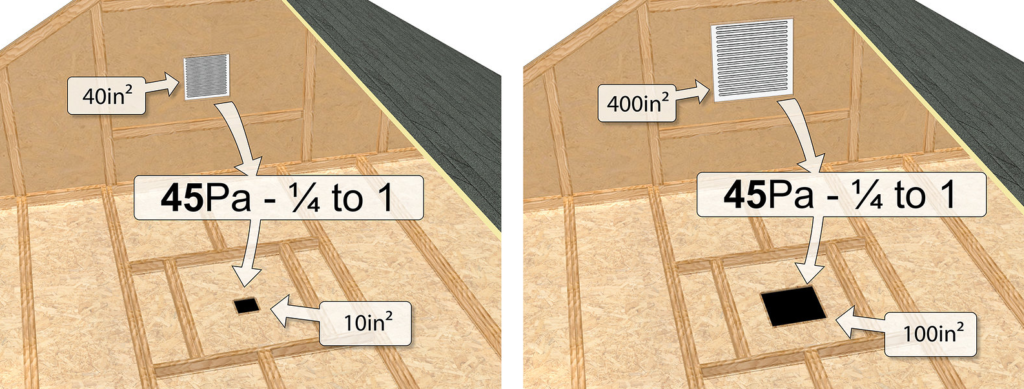
A contractor might have added more venting to the outside to make the existing barrier look better than it is. In that case, you will end up with an improved zonal pressure, but your infiltration will have increased rather than decreased. So when you take a zonal reading and want to know what it means, the next question off your lips should be, “How much venting did it have?” A well-ventilated attic can make a swiss cheese attic floor look like an effective air barrier. If the answer to that question is “a lot,” you don’t have a barrier; you simply have around one-quarter as much leakage to the attic as you have from the attic to the outside. A 10 square-inch hole between the attic and the house and 40 square inches of venting yields the same exact zonal pressure reading as a 100 square-inch hole and 400 square inches of venting (see image below). This may also be why blower-door-guided air sealing is the sole exception to the savings-investment ratio requirement in the WAP energy audit procedures: Not all air sealing reduces CFM50!
Sometimes we may air seal just to better define the pressure boundary in the house. For instance, take a 2-foot x 2-foot square chase opening to the attic with plaster and lath on the four walls of the shaft. For all intents and purposes, the shaft walls are acting as the pressure boundary. So remind me, how does capping an airtight chase with an airtight lid reduce infiltration? It doesn’t. But it does allow us to properly align the thermal boundary.
We are simply redefining where the pressure boundary exists to better suit our vision of where the envelope should now live in that house. So what can you do with this information? If the zone is modifiable, meaning that you can open a door or other means of access to the space or seal off the venting to the space, you can use ZPD software to calculate what percentage of your total blower door CFM is coming through that pathway. It simply needs the input of the CFM50 and zonal to the space being tested in its original state and the input of the modified state. To get the modified state, you could open a pathway between the zone and the space—that is, open the drop-down stairs. As you can imagine, the blower door CFM50 would increase while the zonal pressure would decrease.
Keep in mind that we’d like to see a fairly large change in the zonal and still be able to get the blower door to 50 Pa, so you may have to play with how open the access is. Once you have your new higher CFM and lower zonal pressure, place these values into the calculator and see what the percentage of leakage is for the pathway. This can be especially useful in situations where you find the exact same zonal in more than one zone. For example, if an attic, attached garage, and crawl space all read 37 Pa, but the modified zone testing shows that the attic has 50% of the leakage, that pathway takes top priority. If the zone is not modifiable because there are drop soffits, attached porch roofs, or a joist cavity between floors, the zonal ratios still apply—but use caution here. Since the hole sizes to these spaces are more difficult to approximate, it may be difficult to gauge how much leakage this pathway has. That 37 may seem damning, but if the “venting” to that space is about the size of a dime, then how much of a priority is that space, really?
Fix It
Now that you have discovered the culprit, you must devise a plan. You should give top priority to the biggest leaks that are farthest away from the neutral pressure plane. Aside from that, there are only two ways to address air sealing in these difficult situations: Gain access to the area in question, or turn the area into a cavity that can be filled with an air-sealing material. That’s it. Your goal is to redefine the pressure boundary in a location where it makes sense. What does that look like? In locations that are partially or possibly accessible, you may have to create an access. Creating an access is one thing, but gaining access to what lies beyond may be harder. In general, I would define an accessible space as one that has at least enough room to roll from your back to your stomach while wearing the appropriate protection per OSHA—or whatever authority has jurisdiction.
While the process of air sealing may be slow and difficult, you can have a massive impact in these spaces using traditional air-sealing techniques. Regarding areas where it’s physically impossible to gain access, consider whether it would be practical and safe to use the space as a cavity suitable for dense packing loose-fill insulation. When opting to fill an inaccessible space, special consideration should be given to mold and moisture problems and electrical wiring that may be hidden within the cavity. You should also consider the integrity and weight-bearing capacity of the materials comprising the surfaces of the cavity. If you give the materials an all clear, proceed to break the area into workable sections where dense packing can be achieved. You may have to create plugs with garbage bags or onion bags, or use rigid blocks to prevent contact with heat sources like flues or can lights in order to fill the cavity quickly. Remember: Filling to capacity (that is, not dense packing) is acceptable only in situations where air leakage is marginal to nonexistent.
Prove It
Last, we must prove that we were effective. To me, what separates the home performance industry from all other building trades is our willingness and ability to prove to the client that our measures are effective, often by using the same tests that we used to diagnose the problem in the first place. Infiltration numbers should drop, zonals indicate better separation from outside, and thermal images confirm claims of improved surface temperatures. Don’t worry if you don’t meet your goals the first time—that’s why we test. As you get better at doing your job, the client will be able to see and appreciate the results of your sleuthing and hard work. And that, my friends, is the goal.
That’s all there is to it! Now that you know what to do, it’s up to you to understand what you’re looking at, figure out how to fix it, and prove you achieved what you set out to accomplish.
This article originally appeared in Home Energy magazine, which is the eJournal’s predecessor publication. It was also supported with funding from DOE’s Weatherization Assistance Program.
Earn CEUs
Earning CEUs on the BPA Journal is a member-exclusive benefit. Please log in to complete the quiz and earn them or join as a member today.