May 15, 2023
Measuring Natural Air Leakage
How to calculate ACHnat and reasons it can be a useful metric
By: Randy Williams

When conducting a blower door test, one of the ways we express the findings is with air changes per hour at 50 Pascals (ACH50). As an example, a new home is blower door tested and found to be 2.75 ACH50; this means the entire volume of air inside the home is exchanging with the outside air 2.75 times per hour at the test pressure of 50 Pascals. When discussing blower door testing with builders and homeowners, it can be hard for them to relate to the ACH50 number other than they know the home needs to be less than a certain level of air tightness to meet current code requirements. Expressing the tightness as natural air leakage can sometimes be helpful. How can we calculate the natural air change rate? Well, there’s a formula:
ACH50/n-Factor = ACHnat
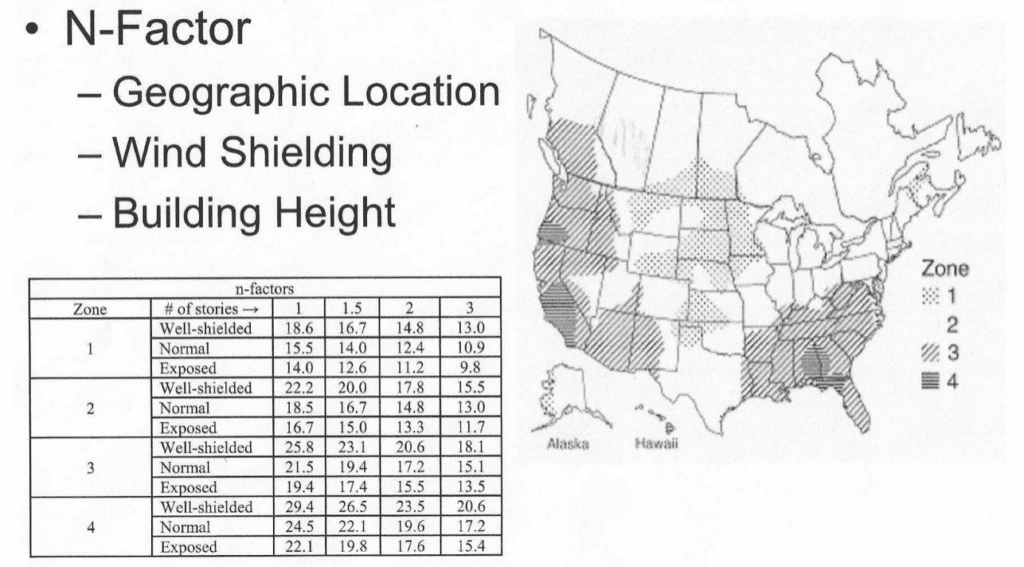
Easy enough formula, but what is n-Factor? The n-Factor (also called the LBL Factor) was developed a few decades ago by the Lawrence Berkeley Laboratory (LBL) as a way to calculate the natural air change rate by using the blower door test results. They came up with a map of the US and Canada that uses wind data for the given location, how well-shielded the home is, and how many stories the home has. The illustration and chart are used to determine the n-Factor for a given area.

Using the area I where live as an example, the arrowhead of Minnesota, the zone two portion of the table would be used. Next, you would have to determine the shielding of the home. I haven’t seen a lot of information on what the parameters are for a well-shielded home compared to an exposed home, so I use the well-shielded table when the home is surrounded by dense woodland or tall buildings. The exposed is when the home is in the middle of a large opening or field. Most homes I test fall under the normal table. Lastly, you need to know the number of stories. In our 2.75 ACH50 home located in the arrowhead of Minnesota, zone 2 normal exposure and one story tall, the n-Factor number is 18.5. Plug that into the formula:
2.75ACH50/18.5 = .15 ACHnat
The home is estimated to have a natural air leakage rate of .15 air change per hour, or roughly 1 complete air change every 6.67 hours. Another way to look at it, nearly 4 complete air changes with outside air per day.
Before moving on, lets look at what the effect is on the example house if it were three stories in an exposed location of zone 1.
2.75 ACH50 / 9.8 = .28 ACHnat
We’ve nearly doubled the estimated natural air change rate by building the home in the winter zone 1, making the building taller and moving the structure to the middle of a field.
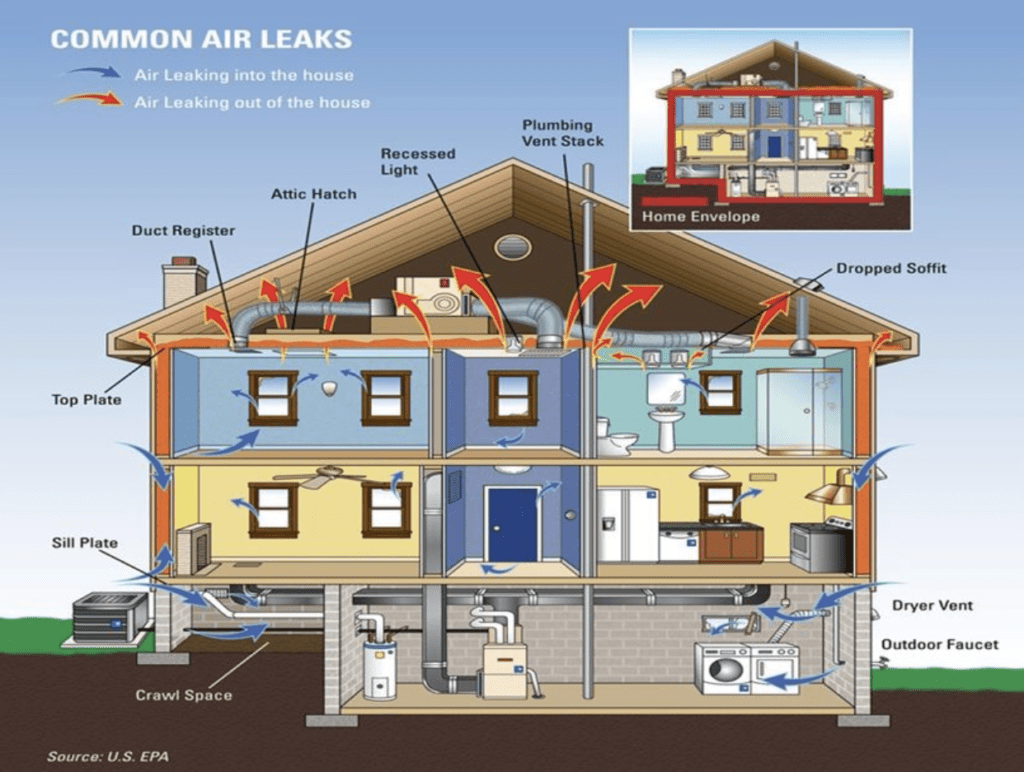
All that being said, the calculated ACHnat number isn’t very reliable. It can vary widely based on several variables unique to every home. These variables include the difference between inside and outside temperatures, wind speed and direction, the location of the air leaks in the home, and the effects of any mechanical ventilation happening in the home. This mechanical ventilation effect may be designed, such as when using different exhaust fans, or by accident, when there are leaky ducts located outside the building envelope. The ACHnat number isn’t great, but it is the best “estimate” I’m aware of.
What can be done with the ACHnat number? Well, we can estimate the heating cost of the air leaks. You’ll need some additional information for this calculation, such as the cost of the heating fuel expressed in cost per BTU, the efficiency of the heating system, the heating degree days (HDD) for the location of the home, the CFM50 blower door number and a constant, the number 26.
(26 x HDD x cost of the fuel/Btu x CFM50) / (n-Factor x efficiency of the heating system)
Back to our original example home in Northern Minnesota, with 9750 heating degree days. The home is heated with a 65% efficient fuel oil boiler (140,000 btu/gallon) with fuel costs at $3 per gallon ($.000021/btu). We will need to use the blower door CFM number instead of the air changes per hour number, 550 CFM50. The example home has a total of 12,000 ft³. Plug all these numbers into the formula:
(26 x 9750 HDD x $.000021 x 550 CFM50)/(18.5 n-fact. x .65 heating efficiency) =$248 per year
The estimated cost of air leakage is $248 per heating season. Change the home to a 3-story built in the middle of a field; the cost increases to $460.
If you live in a cooling-dominated climate, a similar formula can calculate the cost of air leaks when cooling the home.
(.026 x CDD x fuel (cost of electricity / kWh) x CFM50) / (n-factor x SEER)
The formula takes into account sensible cooling only; latent cooling can also have a big effect on costs. The estimated cost due to air leakage in heating and cooling can then be used as a factor when deciding how much to spend on air sealing improvements for the home.
There’s another area where knowing the estimated ACHnat can be important, and that’s in calculating ventilation rates. ASHRAE 62.2-2010 and 62.2-2013 allow the natural air leakage rate for the home to be included in the required mechanical ventilation rate. The ventilation rate formula for 62.2-2010 is:
Ventilation required = (.01 x conditioned area) + (7.5 x (bedrooms + 1))
Back to our example house, which has 3 bedrooms.
(.01 x 1500) + (7.5 x 4) = 45CFM required
According to 62.2-2010, the home is required to have 45 CFM of mechanical ventilation. 62.2 assumes that most homes will have some natural air leakage, this can be accounted for when calculating the required ventilation rates. To calculate the natural air leakage rate in CFM, use the formula:
CFM50 / n-Factor = CFMnat
550 CFM50 / 18.5 = 30 CFMnat
The example home has a natural air leakage rate of 30 CFM. With ASHRAE 62.2-2010, we can’t simply subtract the natural air changes from the required ventilation rate. More math is required. 62.2-2010 assumes there is 2 cfm natural leakage per 100 square feet of floor area.
Square feet of floor area / 100 square feet x 2 = CFMinc
Back to our example house:
1500 square feet / 100 square feet x 2 = 30 CFMinc
We now need to subtract the CFM included number from the calculated CFM natural number. The formula is:
(CFMnat – CFMinc) / 2 = CFMexcess
30 CFMnat -30 CFMexcess / 2 = .5 CFMexcess
The last part of the calculation is to subtract the CFM excess from the CFM required and we will have the required ventilation rate that takes into account the natural air leaks.
45 CFM required – .5 CFMexcess = 44.5 required ventilation
That was a lot of work to reduce the required ventilation rate by half a CFM from the original ventilation calculation. In this home, the reduction isn’t worth the effort when using 62.2-2010. The calculation for the inclusion of air leakage in the 62.2-2013 is much simpler, though the calculation for required ventilation rate is different:
Ventilation required = (.03 x conditioned area) + (7.5 x (bedrooms + 1))
(.03 x 1500) + (7.5 x 4) = 60 CFM required
As you can see, the required ventilation when using ASHRAE 62.2-2013 is 25% is higher than 2010, but we are able to use the entire natural air infiltration rate calculation when using the 2013 version:
CFMreq – CFMnat = CFMvent
60 CFMreq – 30 CFMnat = 30 CFM required ventilation
Depending on which version of ASHRAE 62.2 you base ventilation rates on, you end up with two different requirements. 44.5 CFM using 2010 and 30 CFM using 2013. Without accounting for the natural air leakage of the home, the 2013 ventilation rate would have been much higher. One note on using ASHRAE 62.2, know which version your local codes use; there are older versions of 62.2 used in areas of the country. The example home in Northern Minnesota wouldn’t use any version of ASHRAE 62.2 in calculating ventilation rates, Minnesota has its own ventilation rate formula, and natural ventilation is not allowed to be accounted for.
Though the calculated natural air leakage rate isn’t very reliable, there are still times when knowing the rate in both air changes per hour and cubic feet per minute of air leakage can be useful. Part of my job is trying to convey the importance of air sealing to both homeowners and builders; having a tool to use as a visual is often helpful.
This article was originally published on Green Building Advisor and is republished with permission.
1 Comments
Leave a Comment
You must be logged in to post a comment.


Thanks for making all these calculations available. However, I feel this all still assumes a constant or average environment. I’m trying to improve the air quality in my modest house without just throwing money at the problem.
As a very crude example, there will be situations where cracking a window can be a cost-effective way to achieve much better air quality. The next level would be that the window can be closed when the inside-outside temperature differential exceeds X because the natural air exchanges could be high enough.
I hope to have an ERV/HRV installed by this winter. With standard setups, two items seem to be missing. First, the fan speed should be based on the inside-outside temperature differential. On extremely cold nights in a less-than-perfect house, it is possible that the ERV does not need to be running (Midwest US). Similarly, on cool/dry Spring or Fall days, just open the windows. The other missing piece is monitoring. Air quality monitoring with possible direct or indirect feedback should be standard.
Yes, these constant/average calculations can be used for estimations and sizing, but they could still result in improperly configured air quality systems.
If radon venting is necessary, it needs to be included in any air quality configuration.
In summary, most residential air quality professionals focus on high-end housing and high-end solutions. This makes sense because that is where the money is. As I mentioned above even these solutions could be mismatched. But, what about the average Jane/Joe homeowner? I’m not looking for an answer, just trying to keep it all real.
It is great that we can measure ACH50 with blower door tests. But for instantaneous (daily/hourly) air quality we need to know instantaneous air exchanges. We know delta-temp, wind, and exposure contribute to this. It is a shame that this all gets generalized into a single N-Factor. Minimally, the delta-temp should be pulled out of the N-Factor. Temperature is easily measured and can be used as a control input.
My air quality improvements so far have started with monitoring. That has led me to a small adjustable speed DIY radon vent and a configurable fresh air to HVAC air return vent. Long-term monitoring will be required to decide how well this is doing. Early results suggest more fresh air may be needed, thus I’m hoping to improve my fresh air venting with a DIY HRV before this winter.
Thanks again for all your contributions! They are outstanding! Eric