
Jul 10, 2026
Sealing Electrical Penetrations
Every wire, conduit, and electrical box creates an opportunity for air leakage. A few simple detailing practices can help electricians improve airtightness without adding much time to the job.
By: Randy Williams
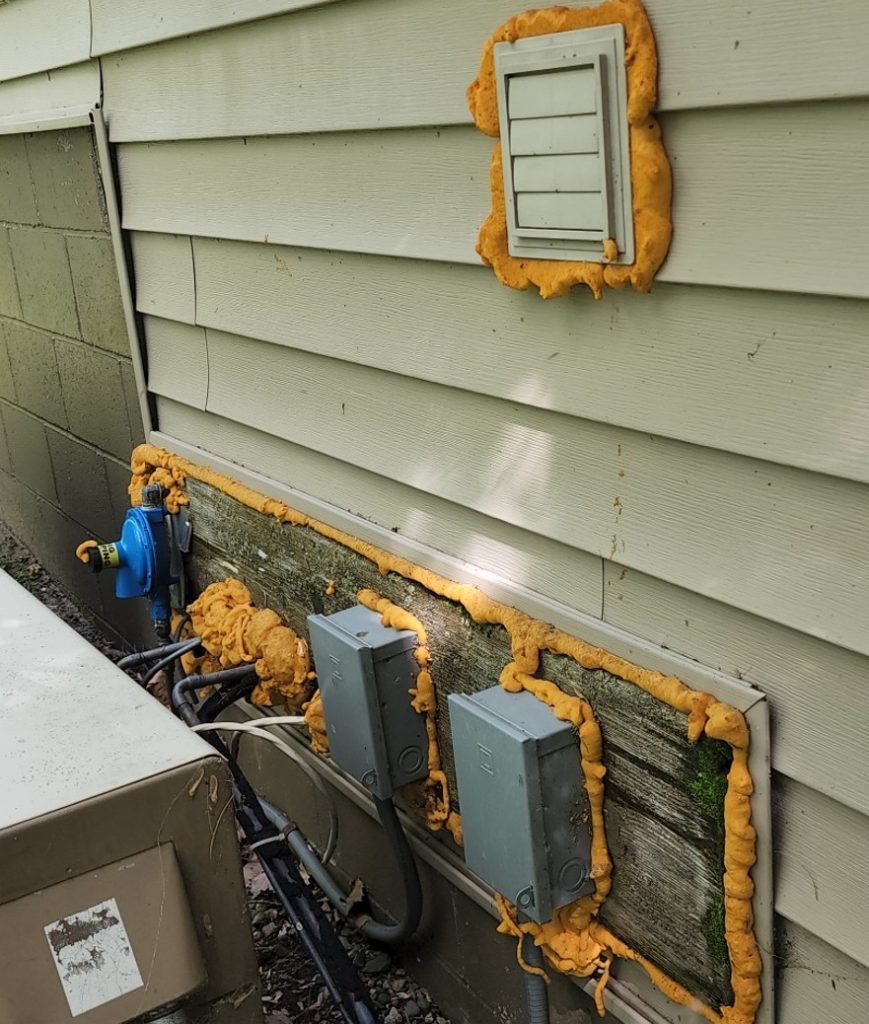
I’ve been a licensed journeyman electrician since 2000 (I haven’t worked as an electrician since 2005, but still keep my licensing requirements up to date). Back in those days, no one was asking us to seal the penetrations for electrical equipment we were making to the outside or into unconditioned spaces. Even today, with building codes requiring all air pathways between conditioned and unconditioned spaces sealed, it’s rare that the electricians are performing those duties. It’s usually left to the insulating contractor, a member of the carpentry crew, or in the case of holes drilled to the exterior of the building, the siding contractor.
It doesn’t have to be that way. With a little training, electricians can easily seal their own penetrations, and the crews I work with today have come to see it as another step in quality workmanship.
What I See in Older Homes
Performing energy audits and blower door tests in older homes has taught me where to look for air leaks. Often, thermal imaging will find the unsealed electrical and plumbing holes that have been drilled into unconditioned attic and crawlspaces.
This thermal image below (taken during the summer when the attic space was hotter than the living space) shows both an unsealed wire penetration (right) and unsealed plumbing vent (left) that connect the home with unconditioned attic. Hot air during the blower door test was being drawn down these holes and into this wall cavity.
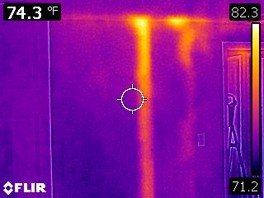
In the case of the electrical penetration, the air was entering the home through the light switch on an interior wall. The plumbing penetration was an air pathway from the basement to the attic.
In winter, the stack effect pushes warm, moisture-laden indoor air toward the attic. If that air leaks through unsealed wiring penetrations and reaches a cold surface, condensation or frost can form. The result may be more than higher energy bills—it can also lead to moisture damage inside the building enclosure.
Sealing the Holes
There are several methods we can use to seal holes and openings used for electrical wires, electrical boxes, and other electrical equipment. Let’s start with the “other equipment.”
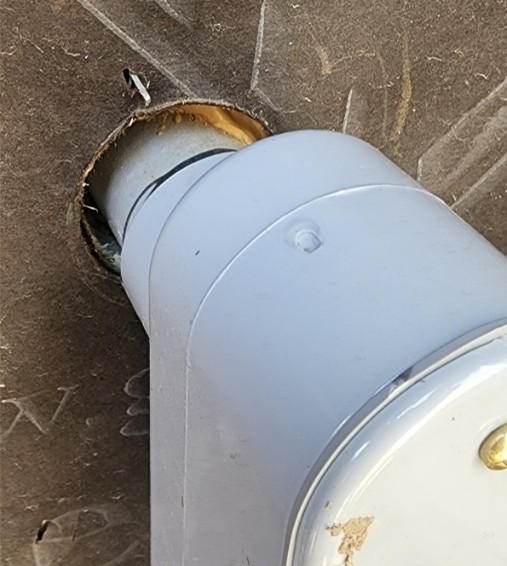
Typically, the biggest hole an electrician will make in a home’s envelope will be for the main electrical service conductors, the large diameter wires that go between the meter base or equipment disconnect and service panel.
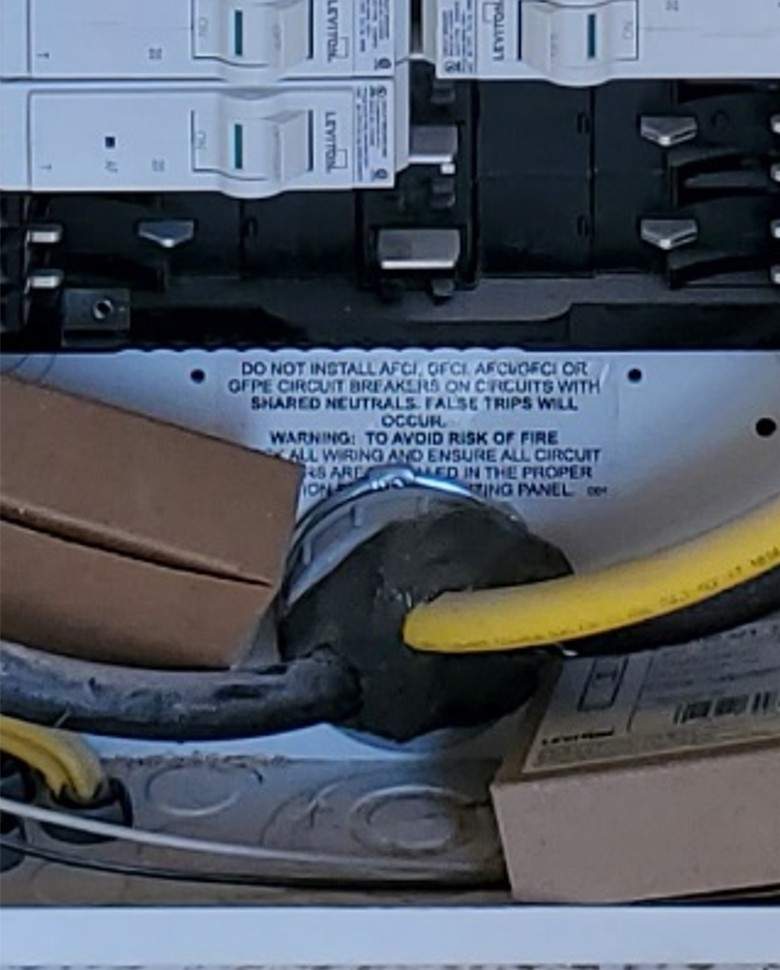
Most modern homes will be equipped with a 200-amp panel, the wires feeding that panel will usually come through a conduit requiring a 2 ½ in. hole. There are two concerns: one is the hole drilled for the conduit, the second is the space inside the conduit—more on that in a bit.
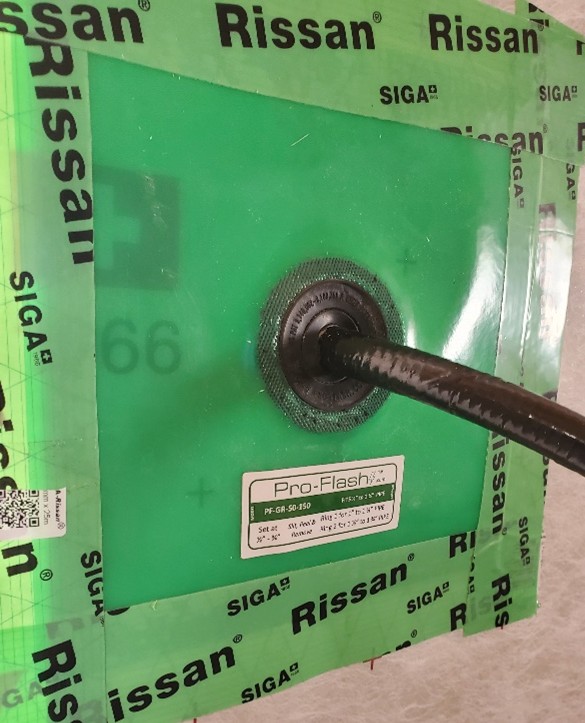
We will need to make the space around the conduit both water and airtight. Sealing the exterior space around the conduit is simple, using a quality sealant to connect the conduit to the water and/or air control layer is one way. My preferred method, though, is to use some sort of gasket; this allows movement of the conduit during both installation and in the possibility of expansion and contraction of the conduit during the temperature fluctuations it may see over its service life. A gasket such as the Pro-Flash (pictured below) can create both a water and airtight connection.
An option for eliminating the needed hole in the air barrier for the electrical conduit is to route the conduit so that it enters the home from underground, either under a slab or through a foundation wall. This requires planning during the construction of the foundation, but it can lessen the bulk water risk.
The second area for air leakage to occur is inside the conduit. The wires fill the majority of the space, but there is still a potential air pathway into the home. The electrical code is specific on what is allowed for air sealing the wires inside the conduit.
NEC-2020 300.5(G)
“Conduits or raceways through which moisture may contact live parts shall be sealed or plugged at either or both ends. Spare or unused raceways shall also be sealed. Sealants shall be identified for use with the cable insulation, conductor insulation, bare conductor, shield, or other components.”
The code states the sealant needs to be identified for use… What electrical inspectors do not want to see is a product that can trap the heat that the wires may produce while in service, so using canned spray foam to seal the wires in the conduit is a no-no.
The product we used when I was working full-time as an electrician is Duct Seal. Duct Seal is a non-hardening putty used to seal the irregular gaps of electrical wires that are inside a conduit. It can be easily removed if the wires inside the conduit need to be changed. Not the easiest product to work with, trying to pack around and between multiple wires can be difficult, but the product is approved for this application.
One Hole, One Wire
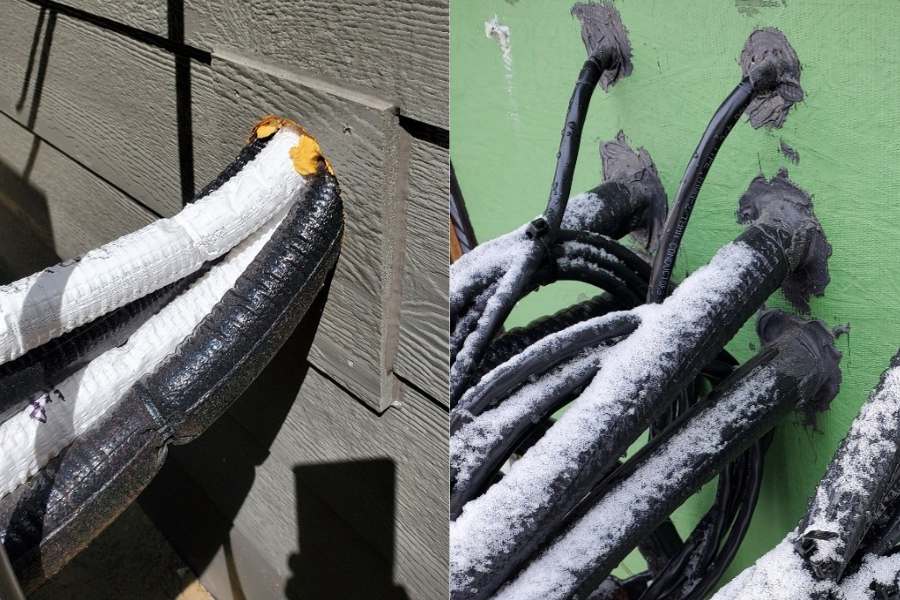
The next set of holes that require sealing are the ones that contain the non-metallic sheathed (Romex) style or an equivalent type of cable. Outside lighting, outlets, and other exterior electrical equipment that requires power will have at least one wire supplying those devices and equipment. Often there are multiple wires (or other products such as an AC or heat pump line set) in one hole such as in the photo below. There is a wire bunched in with this bundle of air conditioner line sets (left photo). This is very difficult to both make watertight and create an effective air barrier. The photo to the right is a strategy used to simplify this problem: one hole, one wire or pipe.
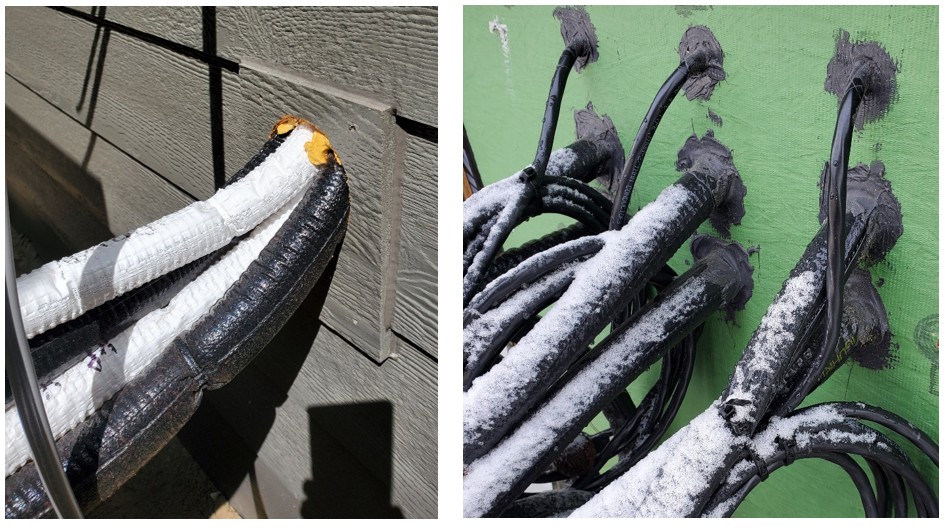
Using a liquid flash product for the seal is one option, my preference is again, to use a gasket. These wires and pipes will be pushed and pulled during the installation of the equipment, possibly breaking both the water and air seal the liquid flash is providing. A gasket will allow for greater movement while maintaining the seal.
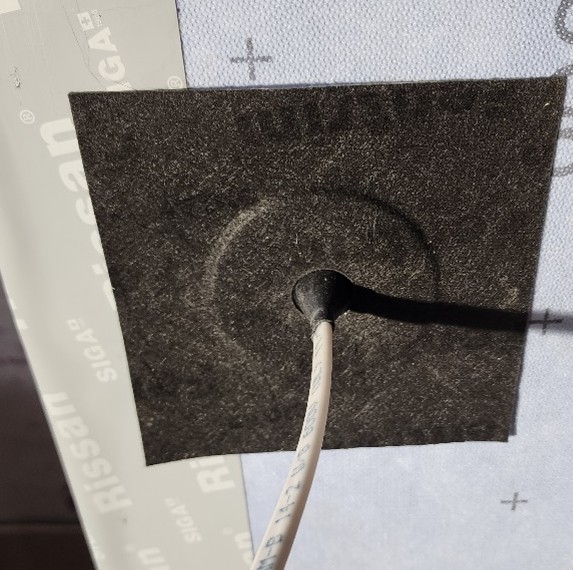
Siga recently released a new Fentrim gasket designed for this purpose. The gasket is available in various sizes, including for specific non-metallic sheathed cable sizes such as 14-2 or 12-2. They can be used on the exterior for water and air management, or on the interior, simply for air control. The photo below shows the gasket designed for 14-2.
My mechanical, electrical, and plumbing (MEP) contractors were not excited about using this “one hole” method the first time, but after explaining why and gaining some experience on how its done, they now use the method without me even needing to remind them. As a mater of fact, one of the contractors has implemented this practice on all his projects.
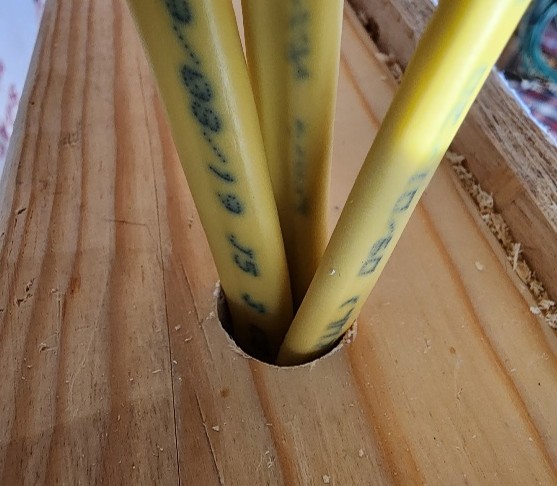
Sealing holes inside wall cavities is the next subject. Again, I prefer to follow the one hole, one wire method to assure the best air seal possible. Can two wires in a hole be air sealed? I’m sure they can, but three or more will create a leak point. That’s not a lot of air, but if you are trying to hit a blower door metric, cutting down on several small leaks can be helpful. Sealing the penetration can be accomplished using canned expanding foam or a quality sealant. One of the tricks is to make sure all the wires are fastened and no longer need to be moved or adjusted. Tugging on a wire after air sealing is complete can break the seal.
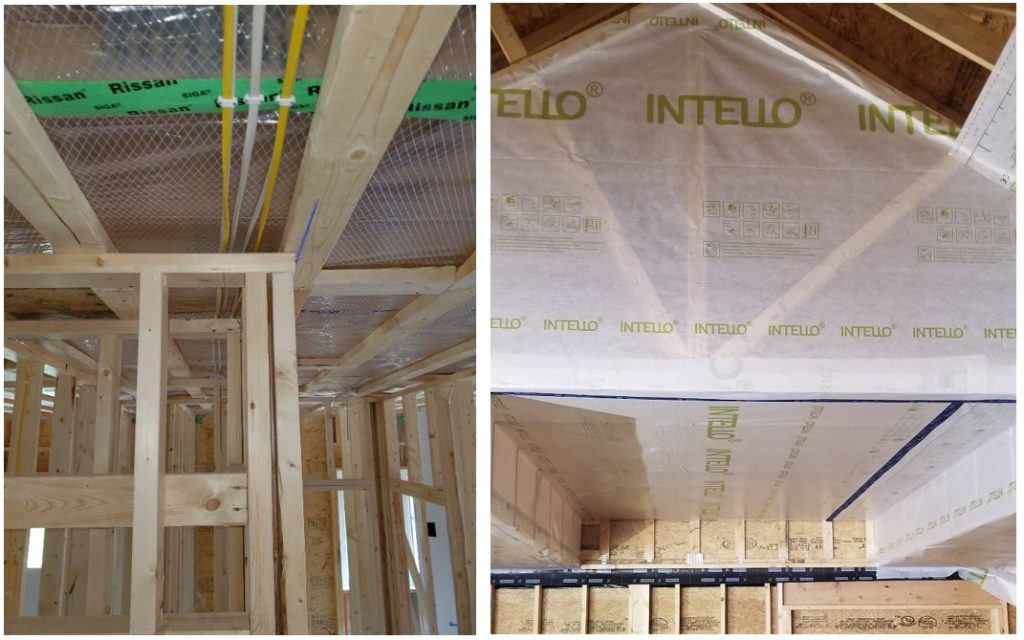
An alternative to sealing wires that leave the conditioned space of the home is to keep as many as possible inside. Creating a service cavity when the main air control is located on the inside of the wall and roof assembly, or moving the main air control to the exterior of the home can satisfy this requirement. Using a plenum truss or by fastening a 2x flat on a wall or ceiling after installing a membrane for the air control are both techniques I’ve used in the past.
No single electrical penetration will make or break a blower door test, but dozens of small leaks scattered throughout a home can add up quickly. The best-performing houses aren’t built with one magic product or one dramatic detail—they’re built by crews that pay attention to hundreds of small ones. Sealing penetrations is one of those details. It’s a simple habit that improves energy efficiency, protects the building enclosure, and helps deliver a better house.
Source: Green Building Advisor

Editor, Green Building Advisor
Randy Williams started his career in 1996 as an apprentice electrician, becoming a licensed journeyman in 2000. After building a home for a family member in 1999, he eventually changing to full time builder in the mid 2000s. In 2009, Randy took energy auditor training and began contracting for a local rural electricity provider conducting energy audits and assessments. Today he continues with energy auditing and assessments along with code compliant blower door testing and residential building diagnostics. He also works with homeowners and builders as an energy design consultant. He has started a local building science group, BS + Beer in his community and writes a blog, www.northernbuilt.pro. You can follow Randy on Instagram @northernbuiltpro.